A consistently high level of quality among parts and components can only be guaranteed if you regularly check results with measurements.
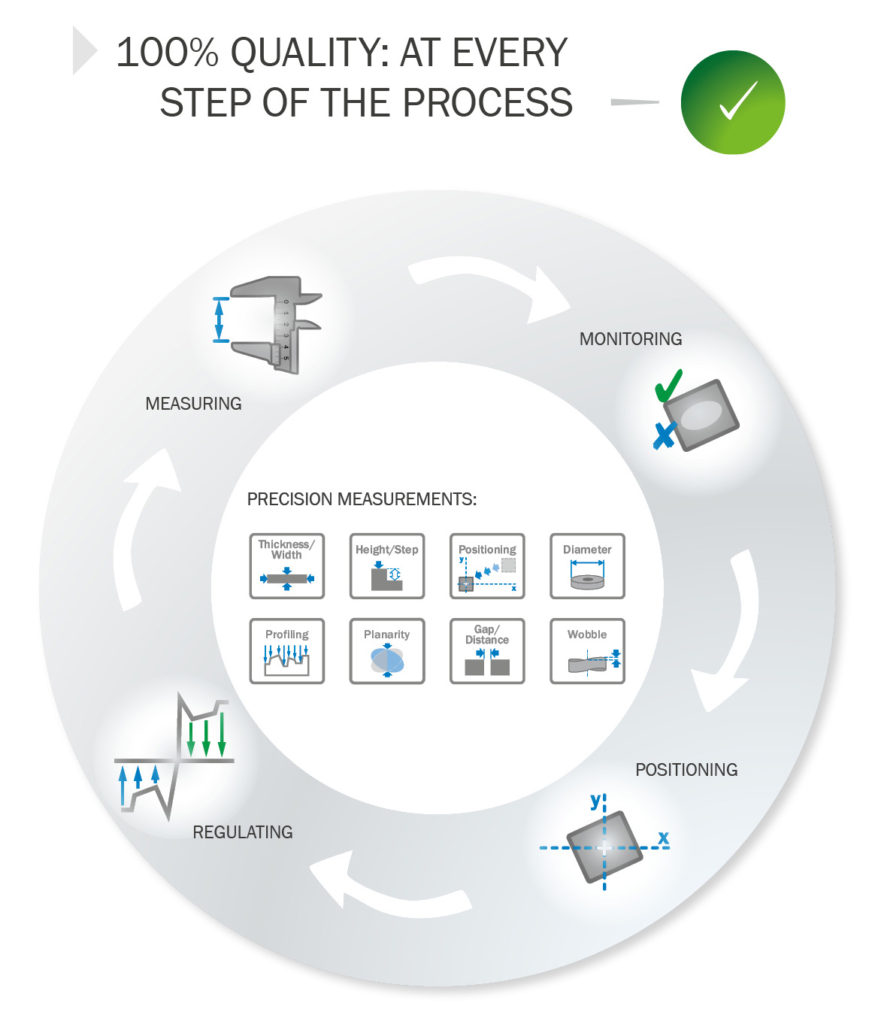
These thorough checks are carried out using a wide array of methods, for example outside of the process by removing sample parts and conducting a mechanical check or by using measurement tools that are integrated directly into the production process. This is precisely the area where optical measuring sensors can show off their strengths.
Click the infographic to enlarge:
Non-contact, precise, and speedy technology: the benefits of optical measuring sensors in contrast to mechanical measuring tools are clear. There is no need to touch the object to be measured so that sensitive materials are protected from distortion or damage. Optical measuring sensors can also be beneficial if the object’s surface is difficult to access.
Whether you opt for 1D or 2D laser triangulation, chromatic confocal measurement processes, or 2D and 3D vision solutions, the high precision measurement of even the smallest object directly in the production process helps to guarantee added efficiency, while making sure quality remains consistently high at every stage of the process.
There is almost no end to the various fields of application for intelligent measurement technology. When it comes to finding the right solution, however, you need a provider with an extensive product portfolio and plenty of experience in using optical sensors:
Electronics: Reliable measurement results in high demand

Displacement measurement sensors especially show their strength when it comes to dealing with fragile components. Because it has up to three sensor heads per evaluation unit, the OD Precision delivers measurement results with the maximum possible precision.
As a result, you can monitor more than just the quality of the surface on individual electronic components, you can also make sure they are aligned correctly. And you do not even need to worry about complicated calibration with the OD Precision.
Automotive and parts suppliers: Precision on the production line

Whether you are installing the front screen or the dashboard, with displacement measurement sensors, grippers are precisely positioned using non-contact technology and a high level of reproducibility and adapted to the components in question.
The sensors’ standalone concept means that you don’t need any additional measured value units. This saves on space and cabling work and includes speedy commissioning. The front screen or dashboard fits perfectly into position.
Machine tools: Quality control from the word “go”

When dealing with sheets, heat and tension can often lead to unevenness or problems with the material. Displacement measurement sensors like the Profiler2 monitor the quality of the weld seam straight after the welding process – all within the process itself and at the earliest stage possible.
2D or 3D Vision and Displacement Measurement Sensors
Only providers with a strong knowledge of applications and an extensive technology portfolio can respond properly to various requirements. 1D or 2D laser triangulation, chromatic confocal measurement processes, or 2D and 3D vision solutions are used in a wide assortment of industries and can make a valuable contribution to quality assurance, cost savings, and, as a result, growing profits. Displacement measurement sensors achieve precision detection, spotting even the tiniest material faults and micro-cracks.
Besides the compact housing design (which means the system takes up less space), the various configuration options and simple commissioning process are two added benefits. If you need to record and monitor additional aspects such as diameter, surface area, or volume, then 2D or 3D vision sensors from SICK are the ideal choice, not just thanks to their wide array of adjustment options.
The combination of various types of technology brings its own benefits. For instance, displacement measurement sensors make sure that electronics cards are in the right position. 2D vision sensors measure hole diameters with a high level of accuracy before 3D vision sensors then determine the height and volume of the electronics cards, making it easier to locate shape defects.
Watch the video to see sensors for quality assurance in action:


